As a homeowner, you may already know that roofs are made of many important components that work together to protect your home. Even the smallest nail contributes to the overall performance of your roofing system.
At Kickapoo Roofing, we are your local roofing professionals in La Crosse and the surrounding areas in Wisconsin. In today’s article, we will discuss all the different parts of a roof.
After reading this quick guide, you will have a better understanding of roofing components and their maintenance and repair needs.
What are the Different Parts of a Roof?
Whether you own a home or manage a business, it’s important to know the components that make up a roof.
#1 Rafters And Trusses
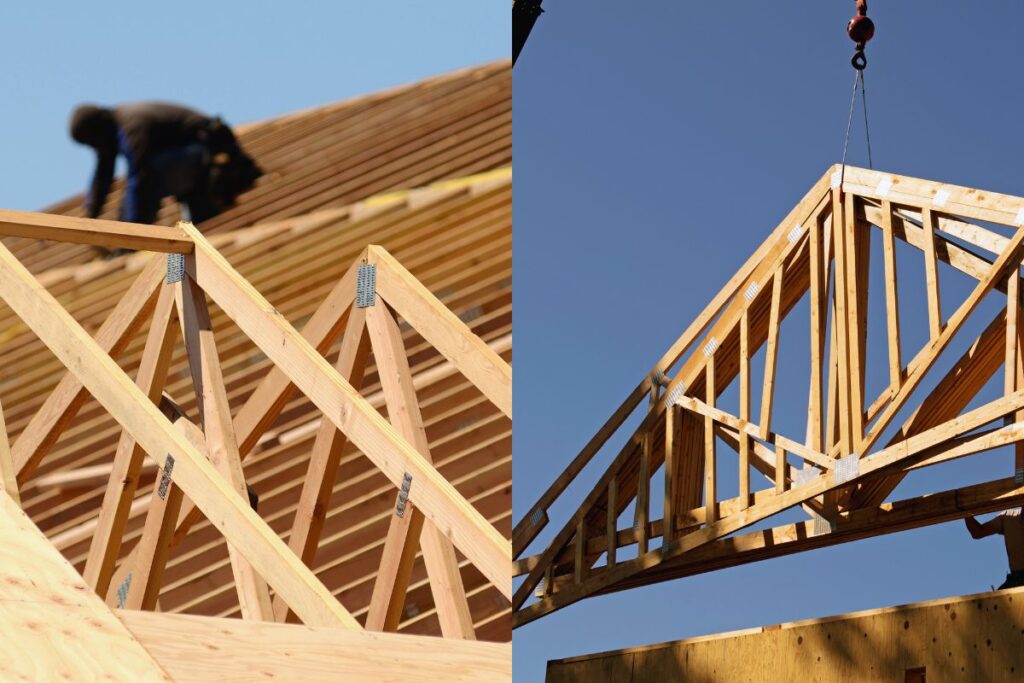
Rafters and trusses are the skeleton for your roof. These wooden or sometimes metal beams provide the main support to your entire roofing system. Most homes either have rafter or trusses, depending on structural needs and the project budget.
Rafters are installed individually at an angle to create the slope of your roof, while trusses are pre-fabricated triangular frames that span the entire width of your home.
Rafters are generally spaced 16 to 24 inches apart and extend from the ridge board at the peak of your roof down to the exterior walls. Both are designed to bear the weight of all other roof components and transfer this load safely to your home’s foundation.
If you have a flat roof, you might have joists instead of angled rafters. These horizontal beams function similarly but create a level surface rather than a pitched one.
#2 Ridge Board

A ridge board is a horizontal beam that runs along the top or peak of your roof. This component is generally made from lumber that’s at least 1 inch thick. All rafters are connected to this central beam, which makes it a necessary component for the roof’s structural integrity.
Ridge boards are placed to provide alignment and support for the rafters. Without a properly installed ridge board, your roof would lack the stability it needs to withstand heavy snow loads or high winds.
#3 Collar Beams

Collar beams, also called collar ties, are horizontal supports that connect opposing rafters. These components are generally installed in the upper third of your attic space and help prevent your roof from spreading or sagging over time.
In areas with frequent storms or high winds, collar beams provide additional stability to your roof structure. While not always necessary in every roof design, they significantly strengthen the overall framework when included.
#4 Roof Decking
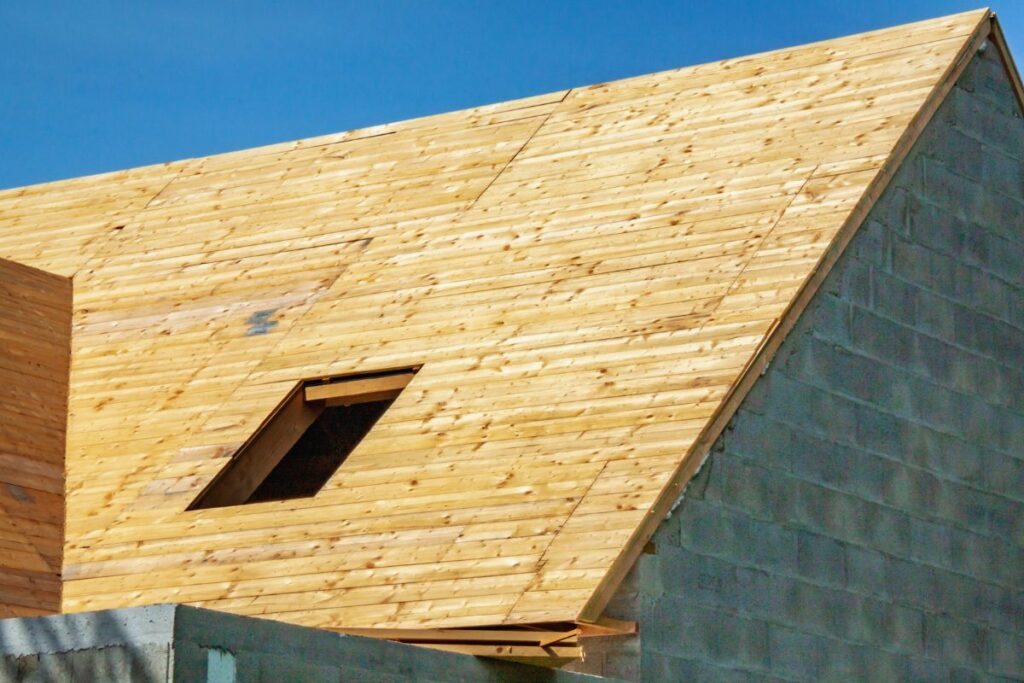
Roof decking, or sheathing, is the layer of material, generally plywood or oriented strand board (OSB), that covers your rafters. This component creates a solid surface for attaching underlayment and shingles. It serves as the foundation for all exterior roofing materials.
The decking must be strong enough to support the weight of workers and roofing materials during installation while also providing a sturdy base for your entire roof system.
Most residential roofs use decking that’s between 3/8 and 3/4 inches thick, depending on the spacing of your rafters and local building codes.
#5 H-Clips
H-clips, also known as panel-edge clips, are small H-shaped metal pieces used when installing plywood or OSB roof decking.
These are placed between the decking panels to provide spacing that allows for normal expansion and contraction of the wood with changing temperatures and humidity. Without these clips, the panels may buckle or warp when they expand, potentially damaging the roof covering.
H-clips also help align the panels properly and add some structural support at the seams, creating a stronger roof deck.
#6 Hip Rafters
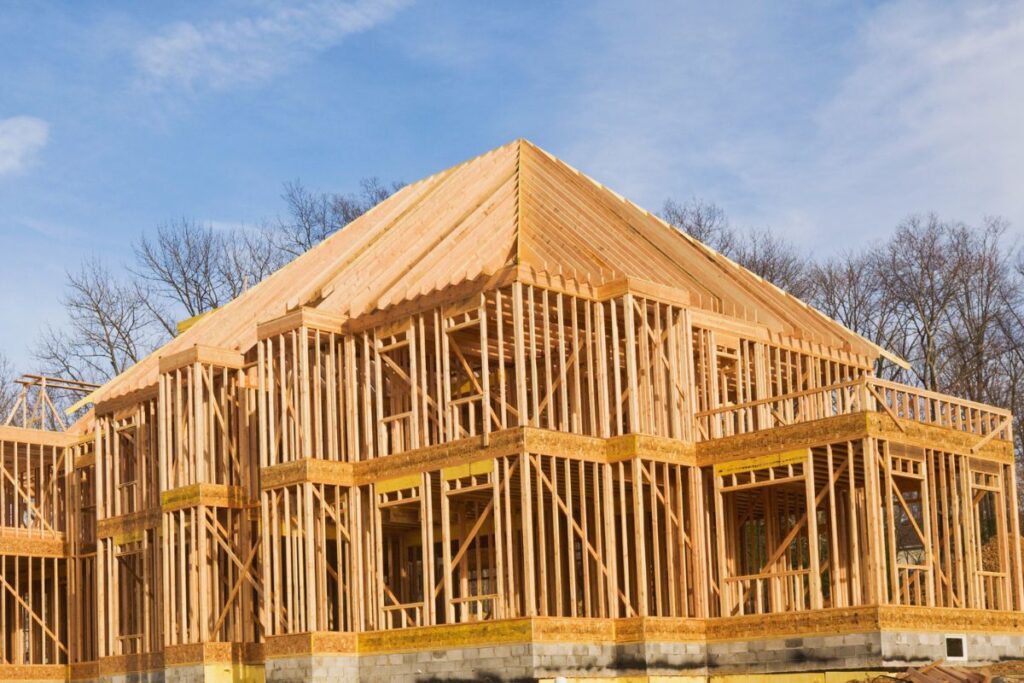
Hip rafters are diagonal rafters that run from the corners of your home up to the ridge board. They’re found on hip roofs, which slope on all four sides. These specialized rafters help create the distinctive shape of a hip roof and provide additional structural support at the corners.
#7 Valley Rafters
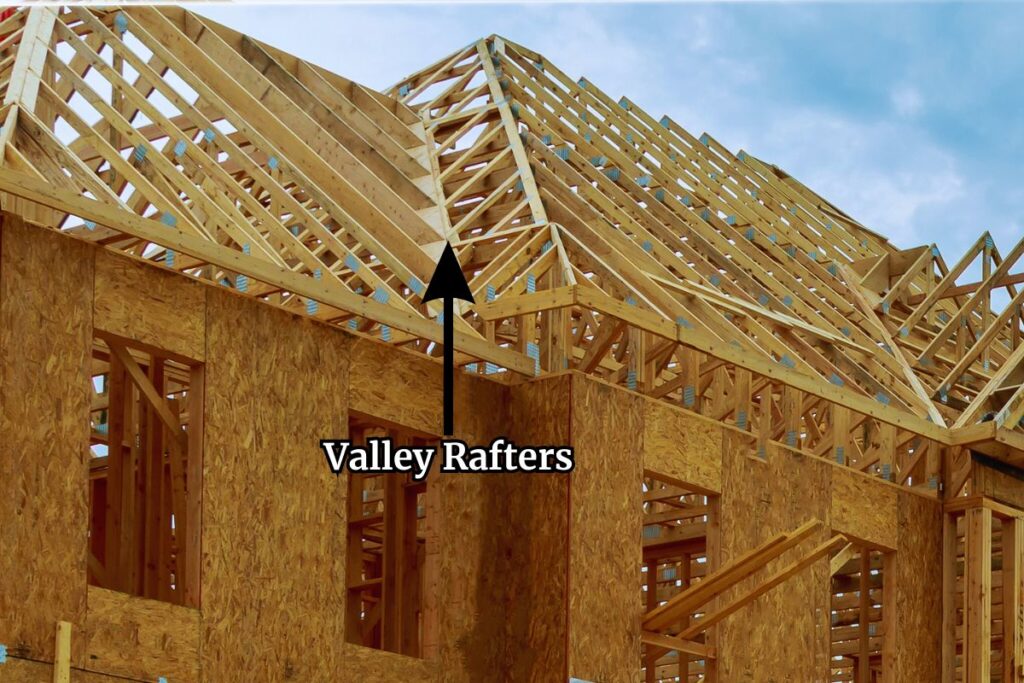
Valley rafters are found where two roof planes meet at an internal angle, creating a valley. These components require special attention during installation because valleys are more vulnerable to water damage. Proper flashing around valley rafters is necessary for preventing leaks.
#8 Jack Rafters
Jack rafters are shorter rafters that don’t extend all the way from the ridge to the eaves. Instead, they connect to hip rafters, valley rafters, or other structural elements.
These components help fill in the roof structure in areas where full-length rafters wouldn’t fit because of the roof’s geometry.
#9 Ceiling Joists
Ceiling joists are horizontal beams that run parallel to the floor across the width of the house. They support the ceiling below while also helping to tie the rafters together, preventing the walls from spreading apart under the roof’s weight.
#10 Underlayment
Underlayment is a water-resistant barrier installed directly on top of your roof decking before the shingles are applied. This important layer of your roofing system provides a secondary defense against moisture penetration if water gets past your shingles.
Modern underlayments are generally made from synthetic materials, though traditional felt paper is still used in some applications.
A roof underlayment not only helps protect your home from water damage but can also improve fire resistance and prevent resin from the decking from damaging your shingles.
#11 Ice And Water Shield
Ice and water shields are a type of underlayment designed to prevent water damage from ice dams and wind-driven rain. This self-adhering membrane usually does not cover the entire roof and creates a watertight seal around the nails that penetrate it, providing superior protection in vulnerable areas.
Most roofing professionals recommend installing ice and water shields along the eaves, in valleys, and around roof penetrations. In regions with severe winter weather, local building codes may require this component along the eaves for a specified distance.
#12 Flashing
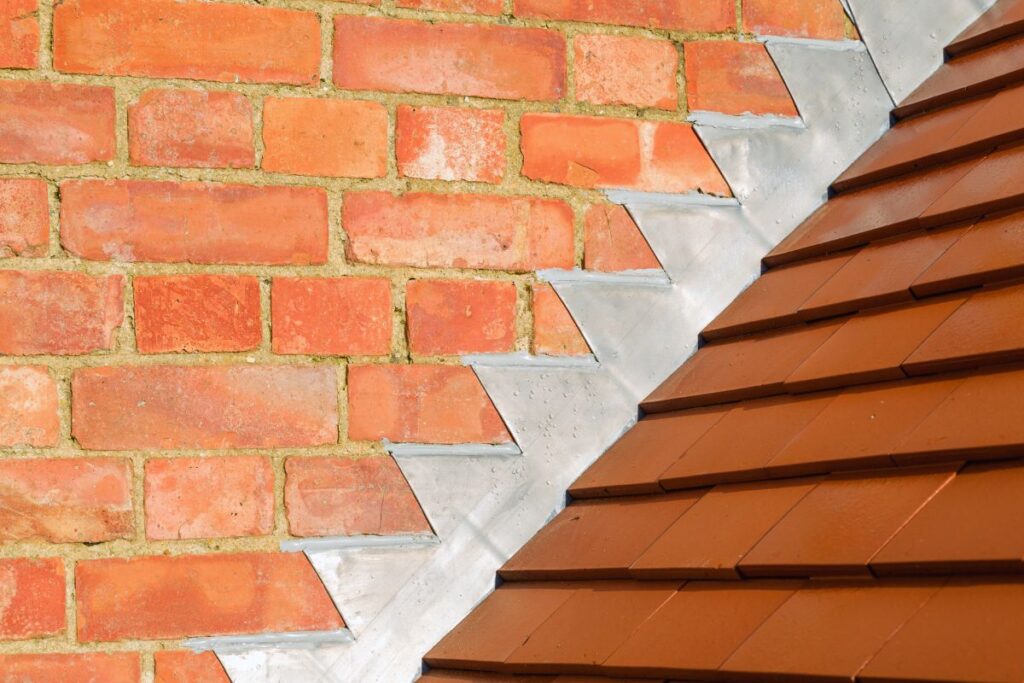
Flashing refers to thin pieces of metal strategically installed at roof joints and penetrations to prevent water infiltration.
You’ll find flashing around chimneys, skylights, vents, and anywhere the roof meets a vertical surface. This component directs water away from these areas, preventing leaks.
Common types of flashing include:
👉 Step flashing: Used where your roof meets a wall
👉 Valley flashing: Protects the valleys where two roof planes meet
👉 Vent pipe flashing: Surrounds pipes that penetrate the roof
👉 Chimney flashing: Creates a watertight seal around chimneys
Proper flashing installation is one of the most critical aspects of a quality roof installation, as many roof leaks occur at these transition points.
#13 Drip Edge
The drip edge, a type of flashing, is installed along the edges of your roof. This L-shaped metal strip extends past the edge of your roof decking and helps direct water into your gutters rather than behind them. It also protects the edges of your roof decking from water damage and rot.
Installing a drip edge is important for the eaves (horizontal roof edges) but is also beneficial along the rakes (sloped roof edges). In many regions, building codes require drip edge installation on all new roofs.
#14 Gutters And Downspouts
While technically not part of the roof itself, gutters and downspouts are your roof’s drainage system. Gutters collect water that runs off your roof and channel it to downspouts, which carry it safely away from your home’s foundation.
Without properly functioning gutters and downspouts, water would simply pour off your roof. This can cause foundation damage, basement flooding, and landscape erosion.
Regular cleaning and maintenance of these components are important for protecting both your roof and the rest of your home.
#15 Roof Vents
We all know about the importance of proper ventilation in our homes. Roof vents allow the air to circulate through your attic space, which helps regulate temperature and moisture levels.
Without sufficient ventilation, heat and moisture can build up, resulting in premature shingle deterioration, wood rot, and even mold growth.
Common types of roof vents include:
👉 Ridge vents: These are mostly installed along the peak of your roofing system
👉 Soffit vents: Located under the eaves
👉 Gable vents: Placed in the gable ends of your roofs
👉 Box vents: Cut into the roof surface
A properly designed roof ventilation system should include both intake vents (usually at the eaves) and exhaust vents (near the peak) to create a natural flow of air through the attic space.
#16 Shingles Or Roof Covering
The roof covering is the most visible part of your roof and provides the primary protection against the outdoor elements.
Asphalt shingles are among the most common choices for residential roofs in the U.S., but other options include metal panels, wood shakes, slate, clay tiles, and synthetic materials.
The right choice depends on your budget, climate conditions, home’s architecture, and personal preferences.
#17 Ridge Caps
The ridge caps are special shingles that are installed along the ridge or peak of your roof. These components not only enhance the roof’s appearance but also provide the required protection at the ridge, where two roof planes meet.
Most ridge caps are made from the same material as your roof covering but are designed to bend over the ridge. Some premium ridge caps have unique profiles for a more appealing look.
#18 Starter Shingles
Starter shingles are specially designed strips installed at the eaves before the first course of regular shingles. These components provide extra protection at the roof’s edge and help secure the first row of shingles against wind uplift.
While some roofers create starter strips by cutting regular shingles, this is not recommended. Manufactured starter shingles that include an adhesive strip for better wind resistance should be used.
#19 Eaves
Eaves, made up of fascia and soffits, are the edges of your roofing system that hang over the walls of your home. This overhang helps keep rainwater away from the walls and foundation by allowing water to flow into the gutters instead of running down the sides of the building. Eaves also provide some shade for windows and can help keep the house cooler in the summer.
- Soffits
The soffit is the underside of your roof’s overhang, which extends beyond the exterior walls. This component not only provides a finished appearance but also, many times, contains vents that allow air to enter your attic space as part of the ventilation system.
Soffits are made from durable materials, including vinyl, aluminum, wood, or fiber cement. Proper soffit installation and maintenance are important for both the appearance of your home and the health of your roof system.
- Fascia
The fascia is a vertical board that runs along the edge of your roof, covering the ends of the rafters or trusses. This component provides a finished look to your roof edge and serves as the mounting point for your gutters.
Like soffits, fascia boards are also made from different materials and play both functional and aesthetic roles in your roofing system.
#20 Gable Ends
The gable end is the triangular portion of the wall that fills the space between the two sloping sides of a gable roof. These triangular walls extend from the eaves to the peak of the roof.
Gable ends can contain vents that allow fresh air to flow into your attic space, preventing moisture buildup and helping to regulate temperature.
The size and style of gable ends affect your home’s appearance. They can be simple or decorated with trim, windows, or siding that contrasts with the rest of the house.
#21 Chimney Cricket
A chimney cricket, sometimes called a saddle, is a small peaked structure built on the high side of a chimney where it meets the roof. Its triangular shape diverts water around the chimney instead of allowing it to pool behind it.
Without a cricket, water could collect behind the chimney, potentially causing leaks and deteriorating the roof materials and chimney flashing over time.
Properly sized and installed crickets are especially important on steeper roofs or with wider chimneys for effective water diversion.
#22 Dormers
Dormers are small structures that project outward from a sloped roof, creating additional space and allowing for windows to be installed. They bring natural light and fresh air into what might otherwise be a dark attic space.
Dormers can change attics into comfortable living areas by adding headroom and improving ventilation.
They come in various styles, such as gable, shed, or hipped, and impact your home’s exterior appearance. Dormers also add a character and visual interest to rooflines.
How Much Does It Cost to Install a Roof?

The cost of installing a new roof depends on some important factors, including the materials you choose, the size of your roof, the complexity of your roof design, and local labor rates.
On average, a complete roof replacement for a normal single-family home may range from $5,000 to $15,000 for asphalt shingles.
Premium materials like metal, slate, or cedar shakes can significantly increase that cost, potentially from $15,000 to $30,000 or more.
Complex roof designs with multiple penetrations, valleys, and dormers will also increase the installation cost because they require more labor and materials.
Remember that while it may seem like a good idea to choose the lowest-cost material option, your roof is a very important part of your home. Investing in quality materials and professional installation can save you money in the long run by maintaining the life of your roof and preventing costly damage to your home’s interior.
What Are The Common Signs You Need A Roof Replacement?
Your roof will eventually show signs that it’s time for replacement. Here are some indicators that you should consider a new roof:
#1 Age
If your asphalt shingle roof is 20 to 25 years old, it’s likely nearing the end of its useful life, even if it still looks good from the ground.
Different roofing materials have different lifespans, so to decide whether you need to replace your roof, you should know the expected lifespan of your roofing material.
#2 Curling Or Buckling Shingles
When your roofing shingles start to curl at the edges or buckle in the middle, they’re no longer providing adequate protection for your home.
#3 Missing Shingles
A few missing shingles after a storm might be repairable, but the widespread loss of shingles suggests your roof is failing.
#4 Granules In The Gutters
As asphalt shingles age, they shed their protective granules. If you notice a large amount of granular material in your gutters, your shingles are deteriorating.
#5 Daylight Through The Roof Boards
If you can see daylight passing through your roof boards from your attic, you have serious issues that need immediate attention.
#6 Sagging Roof Deck
A sagging roof deck indicates structural problems that could result in a catastrophic failure if not addressed promptly.
#7 Water Stains On Ceilings Or Walls
Interior water stains often point to roof leaks, which might indicate the need for roof replacement, especially if the leaks are widespread.
#8 Higher Energy Bills
If your energy costs have increased unexpectedly, poor roof performance could be allowing heat or cool air to escape from your home.
Note: If you notice any of these signs, it’s always best to have a professional roofing contractor perform an inspection.
Sometimes, what looks like a major problem might be repairable, while what seems minor could actually indicate the need for a full replacement.
Get Professional Roofing Services In Wisconsin Today!
At Kickapoo Roofing, we offer honest assessments of your roof’s condition and recommend the most cost-effective solutions for your home’s specific needs.
Our team is here to provide you with the highest quality roofing services in La Crosse and the surrounding areas in Wisconsin.
Your roof protects everything and everyone you value inside your home, so it’s important to make informed decisions about its care and maintenance.
For a free and no-obligation discussion with our professionals, feel free to call us today at (608) 352-8688.
 (608) 352-8688
  schedule consultation
