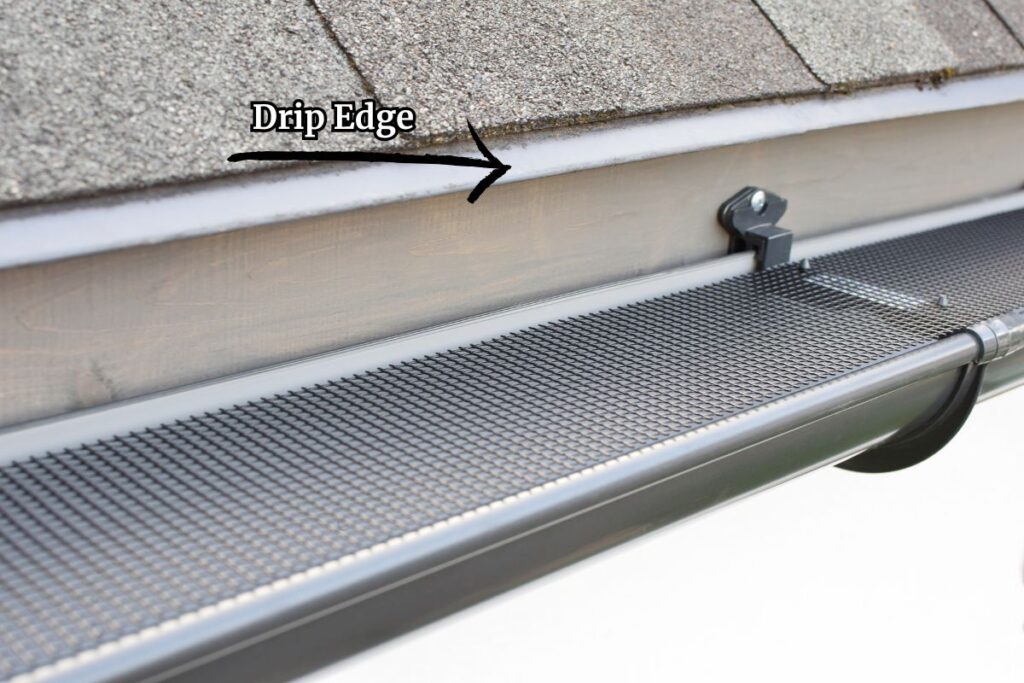
The drip edge is an important part of your roofing system that not only provides a finished look, but also plays an important role in its overall functionality.
At Kickapoo Roofing, we are your trusted roofing professionals serving La Crosse and the surrounding areas of Wisconsin. In this article, we will be discussing everything you need to know about drip edge installation in 2025 in order for you to protect your home with confidence.
What Is A Drip Edge?

A drip edge is a specially designed piece of metal flashing that’s installed along the edge of your roof. It serves as an important barrier that directs water away from the fascia and into your gutters, preventing moisture damage to your roofing structure.
The drip edge extends slightly beyond the edge of your roof, breaking the surface tension of water and ensuring it drops into the gutter rather than clinging to the fascia board.
Most drip edges are made from corrosion-resistant materials such as aluminum, galvanized steel, or copper, and they come in various styles and colors to complement your roof’s appearance.
Beyond water protection, a properly installed drip edge also helps prevent pest infestations and protects your roof from wind-driven rain.
Also Read: What Are Different Types Of Drip Edge?
How Do You Install A Drip Edge?
In this section, we’ll discuss the common steps for drip edge installation.
Materials Required
For a successful drip edge installation, you’ll need to gather these important tools and materials!
👉🏻 Drip edge flashing (generally comes in 10-foot lengths)
👉🏻 Roofing nails (1¼-inch galvanized roofing nails work well)
👉🏻 Hammer or nail gun
👉🏻 Tin snips or aviation shears for cutting the metal
👉🏻 Measuring tape
👉🏻 Chalk line
👉🏻 Safety gloves and goggles
👉🏻 Ladder or scaffolding for roof access
👉🏻 Roofing adhesive or sealant
👉🏻 Pry bar (if replacing existing drip edge)
Installation Instructions
Step 1: Prepare Your Roof Edge
Before installing the drip edge, make sure your roof edge is clean and free from debris.
Inspect the fascia board and roof deck for any signs of rot or damage. Replace any damaged areas before proceeding with the installation.
Step 2: Install The Drip Edge Along the Eaves First
The eaves (horizontal edges) of your roof must have a drip edge installed before you apply any underlayment.
The drip edge should extend about ½ inch past the roof deck, ensuring proper water runoff while preventing excessive exposure to wind uplift. This distance is important because it allows water to drop freely rather than being drawn back under the roof through surface tension.
Step 3: Secure the Drip Edge
Once properly positioned, secure the drip edge to the roof deck using roofing nails. Place nails about 8 to 10 inches apart along the top edge of the flashing. Make sure the nails are driven into the roof deck and not just the fascia board for maximum stability.
Step 4: Creating Proper Overlaps
When joining two sections of drip edge along the eaves, create an overlap of about 2 to 3 inches.
This overlap ensures continuous protection against water infiltration. For the best appearance, try to place these joints away from highly visible areas of your home.
Step 5: Making Corners
At corners where eaves meet rakes (sloped edges), you’ll need to create a custom cut.
Make a notch in the drip edge by cutting the bottom flange and folding the top section to create a neat corner. This allows water to flow properly around the corner without leaking.
Step 6: Install Underlayment
After the drip edge is installed, proceed with laying your roof underlayment. The underlayment should overlap the drip edge on the eaves by 1 to 2 inches.
This layering technique is really important for proper water management.
Step 7: Install Drip Edge on the Rakes
Unlike the eaves, the drip edge along the rakes should be installed on top of the underlayment.
This order of installation ensures that any wind-driven rain flows over the top of the drip edge and down the roof rather than under it.
Step 8: Final Inspection
Once all sections of the drip edge are installed, conduct a thorough inspection. Check for any loose fasteners, improper overlaps, or sharp edges. Make sure the drip edge is securely fastened and properly aligned along the entire perimeter of your roof.
Can You Install Drip Edge Yourself?
Yes, it’s technically possible to install a drip edge by yourself, but make sure that you have the right experience, tools, and skills to do the job nicely.
Drip edge installation requires working at heights, careful measurements, and precise cutting of metal flashing, which can be dangerous for inexperienced homeowners. Moreover, improper installation can lead to serious consequences such as water damage, rot, and premature roof failure.
If you’re comfortable with DIY roofing projects and have experience working with metal flashing, you might successfully tackle this project. However, for most homeowners, hiring a professional roofer is the safest and most reliable option.
Professional installers not only have the necessary experience and equipment but also understand local building codes and manufacturer requirements that must be followed for warranty protection.
Get Professional Roofing Services in Wisconsin
When it comes to your home’s protection, trust the experts at Kickapoo Roofing for all your drip edge installation needs in La Crosse, and the surrounding areas of Wisconsin.
Our team of experienced roofing professionals understands the different challenges that Wisconsin weather can create for roofing systems, which is why we only use high-quality materials and follow the right approaches. This ensures that your drip edge not only looks nice, but also provides lasting protection against water damage, ice dams, and pest intrusions.
Our installers are fully trained and certified, giving you peace of mind that your roof’s important water barrier is installed correctly the first time.
For a free consultation and estimate on professional drip edge roof installation or general roofing services, feel free to call us today at (608) 352-8688.
 (608) 352-8688
  schedule consultation


